CommutingLife Explore The World On Two Wheels
Yes, you can change the color of your bike frame. Changing the color of your bike frame is possible and can be done with proper paint and preparations.
Bicycles can be customized to reflect your personal taste and style by painting the frame in a different color. Painting a bike frame is an affordable and effective way to give your bicycle a fresh new look, and you can choose from a wide variety of colors to suit your preferences.
Whether you want to stand out or blend in, changing the color of your bike frame is a simple and fun way to personalize your ride. In this article, we will explore the process of painting a bike frame and provide some tips to help you achieve a professional-looking finish.
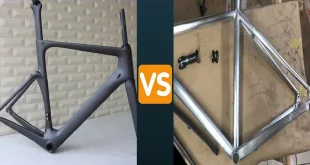
Compatibility With Different Frame Materials
If you’ve been eyeing a vibrant new paint job for your bike frame, you may be wondering if it’s possible to change the color without compromising the integrity of the frame. The good news is that, in most cases, it is indeed possible to give your bike frame a fresh coat of paint.
However, before you dive into the project, it’s important to understand how different frame materials can impact the painting process. Let’s explore the compatibility of various frame materials with bike frame paintings.
Understanding The Impact Of Material On The Painting Process:
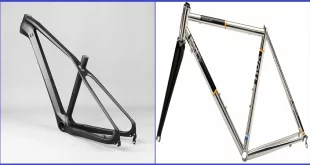
- Steel frames: Steel frames are well-suited for painting due to their smooth, non-porous surface. The material allows for excellent adhesion of paint, resulting in a durable and long-lasting finish.
- Aluminum frames: Painting an aluminum frame requires special attention. This material can be more challenging as it tends to be prone to corrosion and oxidation. Proper surface preparation and the use of compatible primers and paints are essential to ensure a successful and vibrant paint job.
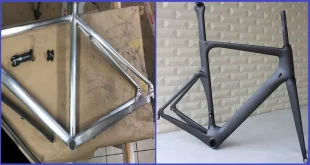
- Carbon fiber frames: The lightweight and high-performance nature of carbon fiber frames presents unique challenges for painting. Unlike steel or aluminum, carbon fiber has a textured surface that requires specialized techniques and paints to achieve a smooth and even finish without compromising the structural integrity of the frame.
Exploring The Challenges And Limitations For Different Frame Materials:
- Steel frames are generally the easiest to paint, as they are durable and have a smooth surface that readily accepts paint. However, they may be heavier compared to other materials.
- Aluminum frames require meticulous surface preparation to address oxidation and corrosion issues. Additionally, the use of appropriate primers and paints designed for aluminum is crucial to ensure a long-lasting paint job.
- Carbon fiber frames pose the most significant challenge when it comes to painting. The textured surface and unique properties of the material necessitate specialized techniques and paints to ensure a successful outcome. It is recommended to consult a professional painter experienced in working with carbon fiber frames to avoid any potential damage.
- It’s important to note that some bike manufacturers may void the warranty if you alter the original paint of the frame. Make sure to check with the manufacturer or your local bike shop before proceeding with any painting.
Now that you understand the compatibility of different frame materials with bike frame paintings, you can confidently explore the exciting world of personalized bike aesthetics. Just remember to prioritize proper preparation, use suitable materials, and if in doubt, consult an expert.
Enjoy the process of transforming your bike frame into a unique and eye-catching work of art.
Preparing The Bike Frame For Painting
Are you tired of the same old color of your bike frame? Do you want to give it a fresh and vibrant look that matches your style? Well, good news! You can actually change the color of your bike frame with a little bit of effort and some DIY painting skills.
In this blog post, we will guide you through the process of preparing your bike frame for painting. So, let’s dive right in.
Importance Of Proper Cleaning And Sanding Techniques
Before you start painting your bike frame, it is crucial to properly clean and sand it. This step is vital as it helps in removing any dirt, grease, or old paint, and creates a smooth surface for the new paint to adhere to.
Here are the key points to keep in mind:
- Begin by thoroughly washing your bike frame with a mild detergent and water to remove any surface dirt or grime.
- After washing, use a degreaser to remove any grease or oil residue from the frame.
- Once the frame is clean, start sanding it using sandpaper with a medium grit. This helps in creating a rough surface that promotes better paint adhesion.
- Pay close attention to areas with chipped or flaking paint. Sanding these spots will ensure a seamless finish.
- After sanding, wipe down the frame with a clean cloth to remove any dust or debris.
Choosing The Right Primer For Better Adhesion And Durability
Now that your bike frame is clean and sanded, it’s time to focus on choosing the right primer. A primer acts as a foundation for the paint and ensures better adhesion and durability. Here’s what you need to consider:
- Opt for a primer specifically designed for bike frames to ensure better adhesion and long-lasting results.
- Look for a primer that is compatible with the type of paint you plan to use. There are different primers available for metal, carbon, and aluminum frames.
- Apply the primer in thin and even coats. This will help in preventing drips or uneven surfaces.
- Allow the primer to dry completely before moving on to the next step.
By following these cleaning and sanding techniques, and choosing the right primer, you’ll be on your way to transforming the color of your bike frame in no time. Be sure to stay tuned for the next part of this blog post where we’ll guide you through the process of painting your bike frame.
Remember, with some patience and attention to detail, you can give your bike frame a whole new look that reflects your personality and style. So, get ready to pedal in style with your newly painted bike frame.
Spray Painting
Are you tired of the same old color of your bike frame? Looking to add a pop of personality to your two-wheeled companion? Spray painting may just be the solution you’re looking for! Not only does it offer a quick and cost-effective way to change the color of your bike frame, but it also allows you to unleash your creativity and make a statement with your ride.
Exploring The Benefits And Drawbacks Of Spray Painting:
Spray painting your bike frame comes with its fair share of benefits as well as drawbacks. Let’s take a closer look:
Benefits:
- Variety of color options: With spray painting, the color possibilities are endless. Whether you want to go for a vibrant neon shade or a classic matte finish, spray painting offers a wide range of colors to choose from.
- Customization: Spray painting allows you to personalize your bike frame exactly to your liking. You can let your creativity run wild and create a design that is unique to you.
- Cost-effective: Compared to other methods of painting or re-coloring your bike frame, spray painting is generally more affordable. It’s a great option for those on a budget who still want to give their bike a fresh new look.
Drawbacks:
- Surface preparation: Before diving into the spray painting process, proper surface preparation is crucial. Failing to adequately prepare the bike frame may result in paint peeling or chipping over time.
- Skill and expertise: Achieving a smooth and even finish requires some level of skill and expertise in spray painting. Without the proper technique, the end result may not be as aesthetically pleasing as desired.
- Time-consuming: Spray painting is not a quick process. It requires patience and multiple coats of paint to achieve a solid and durable finish. If you’re looking for an instant transformation, spray painting may not be the best option.
Step-By-Step Guide To Spray Painting Your Bike Frame:
Now that you’re aware of the benefits and drawbacks, let’s dive into a step-by-step guide to spray painting your bike frame:
Preparation:
- Start by thoroughly cleaning the bike frame to remove any dirt or grease.
- Sand the surface of the frame with fine-grit sandpaper to create a smooth base for the paint to adhere to.
- Mask off any parts you don’t want to be painted, such as the chain or gears, using tape or plastic bags.
Primer:
- Apply a primer specially designed for metal surfaces to ensure proper adhesion of the paint.
- Allow the primer to dry completely according to the manufacturer’s instructions.
Painting:
- Hold the spray paint can approximately 6-8 inches away from the bike frame.
- Apply thin and even coats of paint, starting from the top and working your way down.
- Allow each coat to dry before applying the next one, following the recommended drying time on the paint can.
Finishing touches:
- Once the final coat of paint has dried, inspect the bike frame for any uneven areas or imperfections.
- If necessary, lightly sand those areas and apply additional coats of paint.
Clear coat:
- To protect the newly painted surface, apply a clear coat specifically designed for outdoor use.
- Allow the clear coat to dry completely before reassembling the bike.
With these step-by-step instructions, you’ll be well on your way to transforming your bike frame with a fresh new color. Just remember to take your time, follow the proper techniques, and enjoy the process of adding a personal touch to your two-wheeled companion.
Powder Coating
Have you ever wanted to give your bike a fresh new look? Perhaps the color has started to fade or you simply want to spruce it up to match your personal style. Thankfully, changing the color of your bike frame is possible through a process called powder coating.
This method not only allows you to customize the color of your bike frame, but it also provides a durable and long-lasting finish. In this blog post, we will dive into the advantages and disadvantages of powder coating, as well as explore the process and durability of this popular bike frame painting option.
Understanding The Advantages And Disadvantages Of Powder Coating:
Powder coating has gained popularity among bicycle enthusiasts for several reasons. Here are some key advantages and disadvantages to consider:
Advantages:
- Excellent durability and resistance to abrasions, chipping, and fading.
- Wide range of color options and finishes, allowing for customizations to suit individual preferences.
- Environmentally friendly, as it produces minimal waste and contains no harmful solvents.
Disadvantages:
- Requires professional equipment and expertise for proper application, which may incur additional costs.
- Limited color options compared to traditional wet painting methods.
- Can be challenging to repair if damaged.
Exploring The Process Of Powder Coating And Its Durability:
Powder coating involves a multi-step process that ensures the color adheres to the bike frame effectively. Here’s a brief overview of the process:
- Surface preparation: The frame is thoroughly cleaned and pre-treated, which can involve sandblasting or chemical stripping to remove any existing paint or rust.
- Application: A powdered pigment is evenly applied to the frame using an electrostatic gun. The charged particles adhere to the frame’s surface, creating a smooth and consistent finish.
- Curing: The coated frame is then heated in a specialized oven where the powder melts and forms a durable, protective layer. This curing process strengthens the coating and enhances its resistance to scratches and fading.
When it comes to durability, powder coating offers remarkable performance. The applied finish is resistant to chemicals, uv rays, and extreme weather conditions, making it ideal for outdoor use. Unlike traditional wet painting, powder coating forms a hard surface that prevents the color from peeling or flaking off, ensuring your bike frame retains its vibrant appearance for years to come.
Powder coating provides an excellent solution for changing the color of your bike frame while offering durability and customization options. By understanding its advantages and disadvantages, as well as the powder coating process and durability, you can confidently transform your bike into a stylish ride that reflects your personal taste.
Vinyl Wrapping
When it comes to changing the color of your bike frame, painting might be the first option that comes to mind. But what if we told you there’s an alternative that is just as effective, if not better? Enter vinyl wrapping – a method that allows you to give your bike frame a fresh new look without the hassle of traditional painting techniques.
We will discuss the alternatives to painting with vinyl wrapping, along with the steps to safely apply vinyl wrap to your bike frame.
Discussing The Alternatives To Painting With Vinyl Wrapping:
- Vinyl wrapping is a popular choice among bike enthusiasts who want to change the color of their bike frame without compromising its integrity.
- Unlike painting, which requires stripping down the old paint and applying multiple coats, vinyl wrapping involves the application of a thin adhesive film that can be easily removed when you want to change colors again.
- Vinyl wrap comes in a wide range of colors and finishes, allowing you to personalize your bike frame to your heart’s content.
- It not only provides a sleek and smooth appearance but also acts as a protective layer against scratches, uv rays, and other elements that could damage your bike frame.
Steps To Safely Apply Vinyl Wrap To Your Bike Frame:
Before we jump into the process, remember that patience and attention to detail are key when applying vinyl wrap to your bike frame. Here’s how you can do it:
- Start by cleaning your bike frame thoroughly to remove any dirt, dust, or grease that might affect the adherence of the vinyl wrap.
- Measure and cut the vinyl wrap to fit your bike frame. Make sure to leave a bit of excess material to ensure a seamless wrap.
- Peel away a small section of the backing on the vinyl wrap and carefully apply it to your bike frame, starting from one end and working your way across.
- As you progress, use a squeegee or a similar tool to smooth out any air bubbles or wrinkles that may appear.
- Continue to peel away the backing and apply the vinyl wrap, taking your time to stretch and adjust it as needed.
- When you finally reach the end, use a sharp knife or a precision cutter to trim off any excess vinyl wrap.
- Once the wrap is in place, use a heat gun or hairdryer to gently heat the surface. This will activate the adhesive and ensure a secure bond.
- Carefully press the wrap into any crevices or tight corners to ensure a smooth and seamless finish.
- Finally, give your newly wrapped bike frame a once-over, checking for any imperfections or areas that may need touch-ups.
With these steps, you can easily transform the color of your bike frame using vinyl wrap. Whether you’re looking to stand out with a bold new hue or want to give your bike a sleek and polished look, vinyl wrapping provides a convenient and durable solution.
So why settle for a plain and ordinary bike frame when you can easily customize it to reflect your unique style? Get creative with vinyl wrap and let your bike make a statement on the road.
DIY Bike Frame Painting
Do you dream of cruising down the street on a bike with a frame in the perfect shade of your favorite color? If you’re tired of the same old look and want to give your bike a personal touch, DIY bike frame painting might be the answer.
While it may seem daunting at first, with the right tips and precautions, transforming the color of your bike frame can be a rewarding and budget-friendly project. In this section, we’ll explore the pros and cons of painting your bike frame yourself and provide useful tips to ensure a successful outcome.
Pros And Cons Of Painting Your Bike Frame Yourself
Pros:
- Cost-effective alternative: Painting your bike frame yourself can save you a significant amount of money compared to hiring a professional.
- Customization: DIY painting allows you to express your creativity by choosing unique colors and designs for your bike frame.
- Pride of accomplishment: Completing a bike frame painting project on your own can give you a sense of satisfaction and pride in your skills.
Cons:
- Time-consuming: Diy painting requires time and patience, as you’ll need to dedicate several days to properly prepare, paint, and finish your bike frame.
- Skill and expertise: Achieving a smooth and even finish requires some level of skill and knowledge about painting techniques.
- Potential risks: If not done properly, DIY bike frame painting can result in a less durable finish that may chip or peel easily.
Tips And Precautions For A Successful DIY Painting Project
Tips:
- Choose the appropriate location: Find a well-ventilated area with good lighting to ensure optimal conditions for painting.
- Prepare and clean the frame: Thoroughly clean the bike frame and remove any existing paint or coatings before applying the new paint.
- Use suitable materials: Select high-quality paint designed specifically for metal surfaces to ensure long-lasting results.
- Apply multiple thin coats: Instead of one thick layer, apply several thin coats of paint, allowing each coat to dry completely before adding another.
- Protect sensitive areas: Cover any parts of the bike frame, such as bearings or threaded areas, that shouldn’t be painted to avoid complications.
Precautions:
- Safety first: Wear protective gloves, goggles, and a mask to safeguard yourself from harmful paint fumes and chemicals.
- Take your time: Rushing the painting process can lead to a sloppy finish. Allow adequate drying time between coats and be patient throughout the project.
- Test colors beforehand: It’s a good idea to test your chosen paint color on a small, inconspicuous area of the frame before committing to painting the entire bike.
- Properly handle and store paint: Follow the manufacturer’s instructions for handling, storing, and disposing of paint and related materials to ensure safety and environmental responsibility.
By considering these pros, cons, tips, and precautions, you can embark on a DIY bike frame painting project with confidence. With careful planning and execution, you’ll be able to transform your bike into a stylish, personalized ride that stands out from the rest.
Enjoy the process and get ready to hit the road in style.
Professional Bike Frame Painting Services
Picture this: you’re riding your bike, zooming along with the wind in your hair, when suddenly it hits you – wouldn’t it be amazing if your bike frame had a vibrant, eye-catching color? Well, guess what? You can make that dream a reality! With professional bike frame painting services, you have the power to customize the color of your bike frame and turn heads wherever you go.
But before you dive into a sea of color choices, let’s explore the benefits of hiring professional painters for bike frame customization, as well as the factors to consider when choosing a professional painting service.
Benefits Of Hiring Professional Painters For Bike Frame Customization:
- Expertise: Professional bike frame painters have the knowledge and skills to transform your bike frame into a work of art. They understand the different types of paints and finishes that work best for bike frames, ensuring a long-lasting and beautiful result.
- Quality materials: When you hire a professional painting service for your bike frame, you can expect them to use high-quality materials. From primers to clear coats, professionals ensure that every layer of paint is applied with precision and durability in mind.
- Customization options: Professional painters can offer a wide range of customization options for your bike frame. Whether you’re looking for a classic glossy finish, a sleek matte look, or even a custom design or pattern, they can bring your vision to life.
- Time and convenience: Painting a bike frame can be a time-consuming process, especially if you’re not experienced in it. By hiring professionals, you can save yourself the hassle and focus on other important things in your life, knowing that your bike frame is in capable hands.
Factors To Consider When Choosing A Professional Painting Service:
- Reputation and experience: Look for a painting service that has a positive reputation and a track record of delivering high-quality results. Check out their previous work and customer reviews to get a sense of their expertise and customer satisfaction.
- Price and affordability: While you want the best quality for your bike frame, it’s also important to consider your budget. Compare prices from different painting services and find one that offers a fair balance between cost and quality.
- Turnaround time: Depending on your needs and schedule, the turnaround time for the painting service may be a crucial factor. Inquire about their estimated completion time and make sure it aligns with your expectations.
- Communication and customer service: A good painting service should be responsive and attentive to your needs. Look for clear communication, prompt responses to your inquiries, and a willingness to address any concerns you may have.
Now that you know the benefits of hiring professional painters for your bike frame customization and what factors to consider when choosing a painting service, you can confidently embark on the exciting journey of transforming your bike into a unique and personalized masterpiece.
So go ahead, choose your color, embrace your style, and get ready to hit the road with a bike frame that truly reflects your personality.
Protective Coatings And Finishes
Bike frame paintings can be a fantastic way to freshen up the look of your bike and make it uniquely yours. But how exactly can you change the color of your bike frame? The answer lies in protective coatings and finishes.
Applying a new coat of paint to your bike frame requires careful consideration and proper techniques to ensure a long-lasting and durable finish. In this section, we will explore the different types of protective coatings available and provide some useful tips for maintaining and prolonging the life of your painted bike frame.
Exploring The Different Types Of Protective Coatings:
- Powder coating: This popular option involves applying a dry powder to the surface of the bike frame, which is then heated to create a smooth, durable finish. Powder coating offers excellent resistance to chips, scratches, and uv damage.
- Wet paint: Using traditional liquid paint is another option for changing the color of your bike frame. Wet paint allows for a wide range of color choices and finishes, such as metallic or matte. However, it may not be as durable as powder coating and requires careful maintenance.
- Ceramic coating: This high-performance protective coating offers excellent resistance to heat, chemicals, and abrasions. It provides a glossy, ceramic-like finish that enhances the overall appearance of the bike frame.
- Anodizing: Anodizing is a process that chemically alters the surface of the bike frame to create a layer of oxide, resulting in a durable and corrosion-resistant finish. While anodizing is commonly used on aluminum frames, it may not offer as many color options as other coatings.
Tips For Maintaining And Prolonging The Life Of Your Painted Bike Frame:
- Clean regularly: Regularly clean your bike frame with mild soap and water to remove dirt, grime, and salt deposits. Avoid using abrasive cleaners or harsh chemicals that can damage the paint.
- Apply a protective wax: Use a good quality automotive wax or polish to protect the painted surface and enhance its shine. Apply the wax following the manufacturer’s instructions.
- Touch up scratches: Small scratches and chips can occur over time. It’s important to touch up these areas promptly to prevent further damage. Use touch-up paint that matches the color of your bike frame and follow the instructions carefully.
- Store properly: When not in use, store your bike in a dry and secure location. Avoid prolonged exposure to sunlight, extreme temperatures, and moisture, as these can degrade the paint and finish.
- Handle with care: Be mindful of how you handle and transport your bike to prevent accidental scratches or impacts that can damage the paint. Consider using protective covers or pads during transportation.
Protective coatings and finishes play a crucial role in changing the color of your bike frame. Whether you opt for powder coating, wet paint, ceramic coating, or anodizing, each option requires proper care and maintenance. By following these tips, you can keep your painted bike frame looking vibrant and fresh for years to come.
Common Mistakes To Avoid
Are you tired of the dull and boring color of your bike frame? Do you want to give it a fresh, vibrant look? Well, you’re in luck! With the right expertise and tools, it is indeed possible to change the color of your bike frame.
However, there are some common mistakes that you should be aware of and avoid to prevent any damage to your precious paint job. In this section, we’ll discuss these mistakes and provide you with some tips for repair and touch-up work.
So let’s dive in and make sure your bike frame painting project goes smoothly.
Identifying And Avoiding Mistakes That May Damage The Paint Job:
- Rushing the preparation process: Properly preparing the bike frame before painting is crucial for a successful outcome. Take your time to clean the surface thoroughly, remove any old paint, and ensure it is smooth and dry before applying the new paint.
- Neglecting to use primer: Applying a primer coat is essential for proper adhesion of the new paint to the bike frame. Don’t skip this step, as it helps create a smooth and long-lasting finish.
- Using the wrong type of paint: Different types of paints are suitable for different surfaces. Make sure you choose a paint specifically designed for metal surfaces like bike frames. Using the wrong type of paint may result in peeling or chipping over time.
- Applying too thick of a paint layer: It can be tempting to apply a thick layer of paint to achieve faster coverage. However, this can lead to drips, uneven drying, and an overall poor finish. It’s better to apply multiple thin coats, allowing each coat to dry completely before applying the next one.
Tips For Repair And Touch-Up Work:
- Use touch-up paint pens: For small scratches or chips, touch-up paint pens can be a convenient and effective solution. Choose a pen that matches your bike frame’s color and carefully fill in the damaged area.
- Blend in the new paint: When doing touch-up work, try to blend the new paint with the surrounding area to achieve a seamless finish. You can lightly sand the edges of the damaged area and apply a clear coat after the touch-up paint has dried.
- Use masking tape for protection: When conducting any repairs or touch-ups, it’s important to protect the surrounding areas from accidental paint splatters or scratches. Masking tape can be very useful in preventing any unwanted damage.
- Regular maintenance is key: To ensure your bike frame’s paint job lasts longer, make sure to regularly clean and wax it. This will help protect the paint from environmental factors such as sunlight, moisture, and dirt.
By avoiding these common mistakes and following these helpful tips, you can change the color of your bike frame successfully and maintain a beautiful and durable paint job. So go ahead and give your bike a personalized touch with a fresh coat of paint.
Frequently Asked Questions Of Bike Frame Paintings: Can You Change The Color Of Your Bike Frame?
Can You Change The Color Of Your Bike Frame?
Yes, you can change the color of your bike frame. There are various methods to do so, including painting, powder coating, or using vinyl wraps. However, it is important to consult a professional for best results and ensure proper preparation and application techniques.
How Much Does It Cost To Change The Color Of A Bike Frame?
The cost of changing the color of a bike frame can vary depending on the method chosen and the complexity of the design. Painting typically costs between $100-$300, while powder coating can range from $200-$500. Vinyl wraps are generally cheaper, with prices starting around $50.
Is It Possible To Remove The Existing Paint From A Bike Frame?
Yes, it is possible to remove the existing paint from a bike frame. The process usually involves sanding or using a chemical paint stripper. It is recommended to seek professional assistance to ensure the frame is not damaged during the removal process.
How Long Does It Take To Paint A Bike Frame?
The time it takes to paint a bike frame depends on the method used and the complexity of the design. Painting can take anywhere from a few hours to several days, considering the time required for sanding, priming, painting, and allowing the paint to dry properly.
Can I Paint My Bike Frame Myself?
Yes, you can paint your bike frame yourself, but it is important to have the necessary knowledge, tools, and skills. Proper surface preparation, quality paint application, and a clear coat are crucial for a professional-looking finish. Consider practicing on a small area or seeking guidance from experts to achieve the desired results.
Are There Any Advantages To Changing The Color Of A Bike Frame?
Yes, changing the color of a bike frame can offer several advantages. It allows you to personalize your bike, giving it a unique look. Additionally, a new paint job can provide better protection against rust and corrosion, extending the life of your bike frame.
Conclusion
Updating the color of your bike frame can give it a whole new personality and make it stand out from the crowd. The process of changing the color of your bike frame is relatively simple and can be done with the right tools and techniques.
Whether you want a bold and vibrant color or a subtle and understated hue, there are endless possibilities for transforming your bike into a unique work of art. From spray painting to powder coating, each method has its advantages and considerations.
While the DIY approach may save you money, professional services can offer a more durable and professional finish. Whatever option you choose, make sure to thoroughly clean and prepare the frame beforehand to ensure a long-lasting and seamless result. So, go ahead and unleash your creativity—changing the color of your bike frame is an exciting and rewarding project that will give you a bike that is truly one-of-a-kind.